Animated Objects
Warning
This system is in beta, you may experience bugs.
If you do run into one, or have any ideas/suggestions, it would help everyone if you could please create an issue.
Animated Object Setup
If at any point the motor6d.Part1.Name is not the same as it was in the uploaded animation, the animated object will not animate.
Enable initOptions.AnimatedObjectsDebugMode for detailed prints about animated objects.
If at any point an attached animated object is a tool, the Rig.Right Arm.RightGrip or Rig.RightHand.RightGrip weld will be disabled. It will be be re-enabled upon detaching.

The explanations below use the image above as an example.
motor6d only
Useful if you have a tool to equip and want to attach the motor6d to it for animating (works for models too). (jump to "motor6d only" finished product)
-
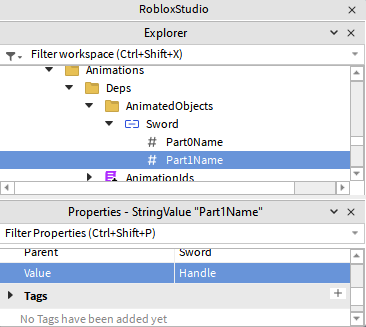
Copy the old
motor6d("Handle"in the example) that was used for attaching thetool("Sword"in the example) to the rig during animating. -
Paste the new
motor6dintoAnimations.Deps.AnimatedObjects. -
Rename the new
motor6dtotool.Name("Sword"in the example). -
Create two
StringValuesinside of the newmotor6dand name them"Part0Name"and"Part1Name". -
Set
Part0Name.Valuetomotor6d.Part0.Name("Right Arm"in the example) andPart1Name.Valuetomotor6d.Part1.Name("Handle"in the example). -
(optional) Configure your
AnimationIdsmodule to enable auto attaching and auto detaching.
"motor6d only" finished product:

"motor6d only" code example:
-- Manual attaching (in a ServerScript)

-- This will equip the 'swordTool' and then attach the "Sword" motor6d to allow
-- the sword animations to work
Animations:EquipAnimatedTool(game.Players.YourName, swordTool, "Sword")
or
-- Auto attaching (in the AnimationIds module)

local AnimationIds = {
    Player = {
        -- The sword motor6d will be auto attached to the equipped
        -- sword tool when the "SwordWalk" animation plays
        SwordWalk = HasAnimatedObject(0000000, "Sword", { AutoAttach = true })
    }
}
-- Bad code:
humanoid:EquipTool(swordTool)
Animations:AttachAnimatedObject(game.Players.YourName, "Sword")

-- This is not allowed! Attaching the "motor6d only" will fail in this way
-- because 'humanoid:EquipTool(swordTool)' acts asynchronously if the tool is in
-- the player's backpack. It is a Roblox quirk discussed here:
-- https://devforum.roblox.com/t/-/3667271
"motor6d only" ToolName module:
(optional) You can specify what tools this motor6d will auto-attach to inside
the ToolName module in order to have it auto-attach to multiple sword types:
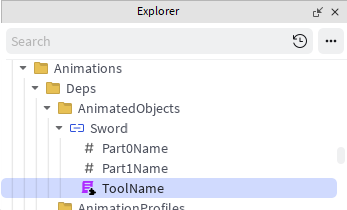
-- Inside of `Animations.Deps.AnimatedObjects.Sword.ToolName`

return {"BlueSword", "RedSword"} -- This will automatically include the motor6d name as well ("Sword" in this case)
basepart, model, tool
Useful if you want to attach a clone of a basepart, model, tool to the rig for an animation. (jump to "basepart, model, tool" finished product)
-
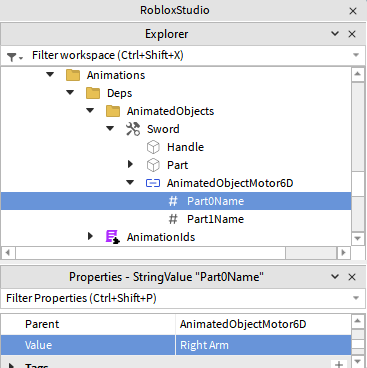
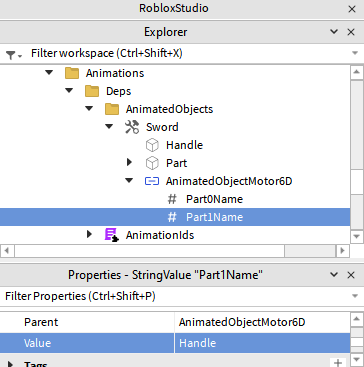
Copy the old
basepart,model,toolthat was used as theanimatedObjectin the rig during animating.- Paste the new
animatedObjectintoAnimations.Deps.AnimatedObjects.
- Paste the new
-
Copy the old
motor6dthat was used for attaching theanimatedObjectto the rig during animating.- Paste the new
motor6dinto the newanimatedObject.
- Paste the new
-
Rename the new
motor6dto"AnimatedObjectMotor6D". -
Create two
StringValuesinside of the newmotor6dand name them"Part0Name"and"Part1Name". -
Set
Part0Name.Valuetomotor6d.Part0.Name("Right Arm"in the example) andPart1Name.Valuetomotor6d.Part1.Name("Handle"in the example). -
(optional) Configure your
AnimationIdsmodule to enable auto attaching and auto detaching.
"basepart, model, tool" finished product:
"basepart, model, tool" code example:
-- Manual attaching (in a ServerScript)

-- This will parent a clone of the "basepart, model, tool" to the character and
-- attach the "Sword" motor6d to allow the sword animations to work
Animations:AttachAnimatedObject(game.Players.YourName, "Sword")
or
-- Auto attaching (in the AnimationIds module)

local AnimationIds = {
    Player = {
        -- This will parent a clone of the "basepart, model, tool" to the
        -- character and attach the "Sword" motor6d to allow the sword
        -- animations to work automatically when the "SwordWalk" animation plays
        SwordWalk = HasAnimatedObject(0000000, "Sword", { AutoAttach = true })
    }
}
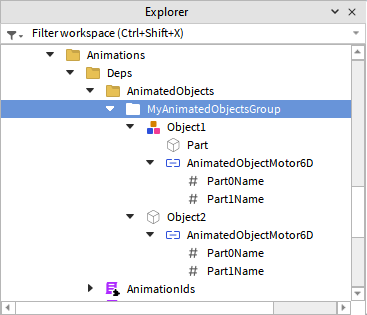
folder
Useful if you want to attach a clone of multiple objects to the rig for an animation. (jump to "folder" finished product)
- Create a folder inside of
Animations.Deps.AnimatedObjectsnamed whatever you would like. - Repeat the "basepart, model, tool" process for all the
animatedObjectsthat you want to be attached at the same time. - (optional) Configure your
AnimationIdsmodule to enable auto attaching and auto detaching.
"folder" finished product:
"folder" code example:
-- Manual attaching (in a ServerScript)

-- This will do the same thing as in the previous example except to each item in
-- the folder
Animations:AttachAnimatedObject(game.Players.YourName, "MyAnimatedObjectsGroup")
or
-- Auto attaching (in the AnimationIds module)

local AnimationIds = {
    Player = {
        -- This will do the same thing as in the previous example except to each
        -- item in the folder
        Walk = HasAnimatedObject(0000000, "MyAnimatedObjectsGroup", { AutoAttach = true, AutoDetach = true })
    }
}